
OneNote is a fantastic way to organise your work, and with a little creativity it can be used to kickstart your Kanban journey.
Before diving in, it’s worth pointing out that if you’re looking to seriously use Kanban you’d be better off with a platform such as Clixoni, which includes a full project management tool.
However, if you’re a OneNote fan, then by following the ten straightforward steps outlined, you’ll soon find yourself navigating the world of Kanban effortlessly in OneNote, maximizing your productivity and staying on top of your tasks like a pro.
Key Takeaways
- Utilize OneNote for task management and create a Kanban Board for efficient organization.
- Customize Kanban board layout, share with team, and enhance productivity with user-friendly features.
- Organize notebook sections for clear workflow stages, visual representation, and structured task management.
- Customize task prioritization, progress tracking, and board design options for personalized workflow management.
Set Up OneNote Account
To begin setting up your OneNote account you’ll need to have a Microsoft account. If you’ve signed up to Microsoft 365 you’re good to go!
Download and install OneNote and let’s dive in.
A Kanban Board is a visual tool that helps you manage and track your tasks effectively. You can set up your Kanban Board by creating columns representing different stages of your tasks, such as ‘To-Do,’ ‘In Progress,’ and ‘Completed.’ Within each column, you can add individual task cards that outline specific action items.
These task cards can include details like due dates, priority levels, and additional notes to keep you organized. By using OneNote’s flexible interface, you can easily drag and drop task cards between columns as you progress through your work, providing a clear and structured way to manage your tasks efficiently.
Open OneNote App
After setting up your MicroSoft account, the next step is to open the OneNote app on your device to begin creating your Kanban board.
Special Offer
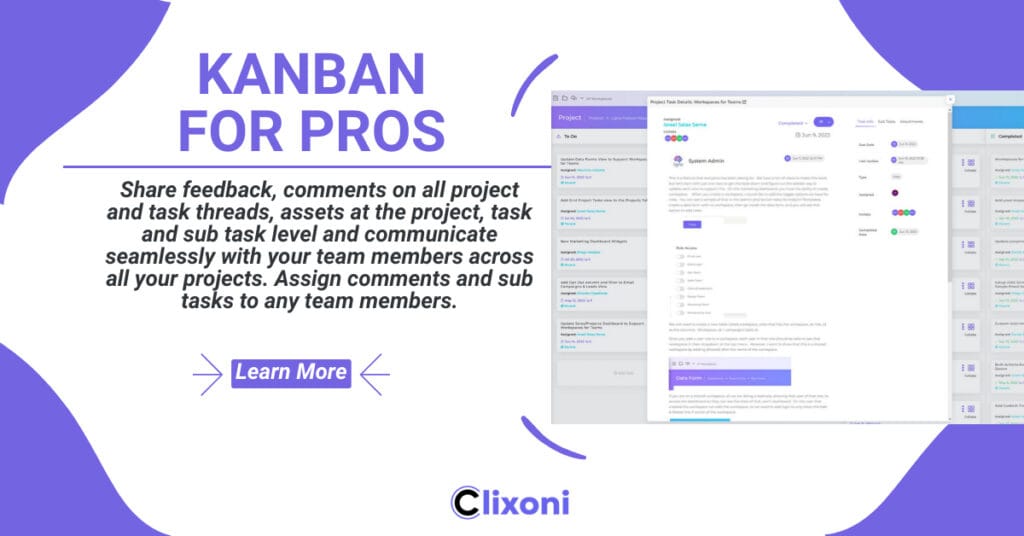
Looking for More Advanced Project Management Features?
While OneNote offers great flexibility for basic task management using the Kanban method—if you’re ready to take things up several notches—you should check out our special offer on Clixoni’s comprehensive project management tool!
For just $27 (lifetime access), you’ll get features like:
- Centralized Project Management Dashboard
- Multiple Views (Kanban included!)
- Infinite Sub-tasks & Flexible Statuses
OneNote provides an intuitive platform for task management, making it easy to set up and manage your Kanban boards efficiently.
By opening the OneNote app, you gain access to a range of features and tools tailored for creating and customizing your Kanban board to suit your specific workflow requirements.
The user-friendly interface of OneNote ensures seamless navigation and organization of tasks within the Kanban board.
Creating a Kanban Board in OneNote allows for flexibility in arranging and prioritizing tasks.
You can leverage the collaborative nature of OneNote to share the Kanban board with team members, enabling effective teamwork and real-time updates on progress. By opening the OneNote app, you embark on a journey towards streamlined task management and enhanced productivity through the utilization of Kanban boards.
Create a New Notebook
Creating a new notebook in OneNote sets the foundation for organizing your Kanban board effectively.
When setting up your Kanban board, starting with a new notebook in OneNote is crucial.
Here’s why:
- Centralized Organization: A new notebook allows you to keep all your Kanban board information organized in one place, making it easier to manage your tasks and projects efficiently.
- Easy Identification: You can name the notebook based on your project or task, providing quick identification and ensuring you’re working on the correct board.
- Dedicated Space: Each notebook in OneNote acts as a separate entity, offering a dedicated space for your Kanban board, preventing confusion between different boards.
Add Sections to Notebook
When adding sections to your notebook, it’s essential to organize them effectively for easy access to information.
Customize your section layouts precisely to suit your workflow and enhance productivity.
Organize Sections Effectively
To effectively organize your Kanban board in OneNote, begin by adding sections to your notebook that represent distinct stages of your workflow. Sections play a crucial role in structuring your board and tracking progress efficiently.
Here are three key tips for organizing your sections effectively:
- Clearly Define Workflow Stages: Assign each section to a specific stage like Backlog, In Progress, or Completed to maintain clarity.
- Maintain a Structured Layout: Ensure a logical order of sections to facilitate a smooth flow of tasks through your Kanban board.
- Enhance Visual Representation: Organize sections in a visually appealing manner for better comprehension of your workflow stages.
Customize Section Layouts Precisely
For precise customization of section layouts in OneNote to enhance your Kanban board’s organization, focus on adding sections to your notebook that distinctly represent various stages of your workflow.
Create three columns in your notebook labeled Backlog, In Progress, and Completed to effectively manage tasks. Each section layout should cater to a specific stage of task management, allowing you to prioritize, track, and organize your work efficiently.
By structuring your sections thoughtfully, you can visually map out your task flow and ensure a seamless progression from one stage to another. Clear section layouts in OneNote enable you to segment your tasks logically, leading to improved task management and overall productivity.
Customize your sections to suit your workflow and optimize your Kanban board for success.
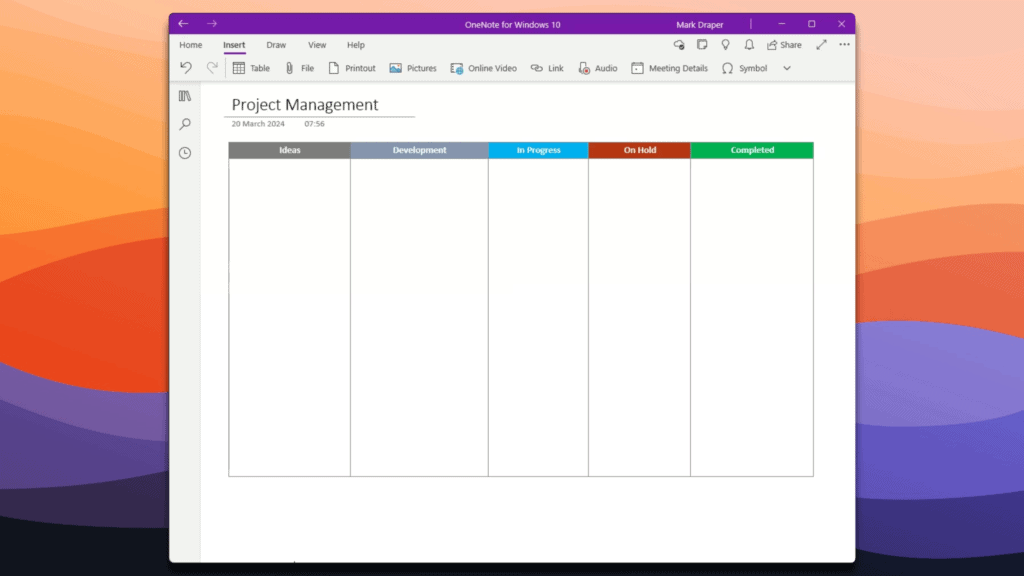
Create a New Page
To initiate the Kanban board creation process in OneNote, you should commence by opening a blank page. Here are the steps you can follow to create a new page: Next, navigate to the “Insert” tab and select “Table” to create a grid for your Kanban board. Once the table is created, label the columns with “To Do,” “Doing,” and “Done” to reflect the different stages of your workflow. For a more detailed guide, refer to the kanban board setup tutorial provided in OneNote’s help section.
- Click on the ‘Add Page’ button in your OneNote interface to start a fresh page for your Kanban board.
- Name the page according to the project or area of focus to keep your task management organized.
- Begin structuring the page by adding tables, lists, or any other elements that will help represent your workflow stages effectively.
Creating a new page in OneNote serves as the foundation for your Kanban board, allowing you to tailor the layout to your specific needs.
This clean and structured approach will enable you to manage tasks efficiently within the Kanban system. Remember, each new page can be dedicated to a different project, ensuring clarity and focus in your task management process.
Design Your Kanban Columns
After creating a new page in OneNote to lay the foundation for your Kanban board, the next step is to design your Kanban columns for effective task management.
Customizing columns such as Backlog, In Progress, and Completed for different task stages is essential. These columns should align with the stages of task completion to provide a clear workflow.
To create columns simply type your headings and press Tab. This tells OneNote to create a table.
Naming each column clearly is crucial to indicate the flow of work within your Kanban Board. Consider using colors or icons to visually distinguish between the various columns, making it easier to identify different task stages at a glance.
The top row is your column headers, the second row can be extended out by pressing Enter (or Shift Enter if using the online version) to give you space to add items.
It’s important to ensure that your columns accurately reflect your workflow and task progression, allowing for smooth and organized task management.
By customizing your columns thoughtfully, you can create a Kanban Board that perfectly fits your unique workflow and enhances your productivity.
Add Tasks to Kanban Board
When populating your Kanban board in OneNote, you can easily assign tasks to specific columns reflecting their current progress status.
Adding tasks to your Kanban Board in OneNote is a straightforward process that aids in effective task management.
Here’s how you can add tasks to your Kanban Board:
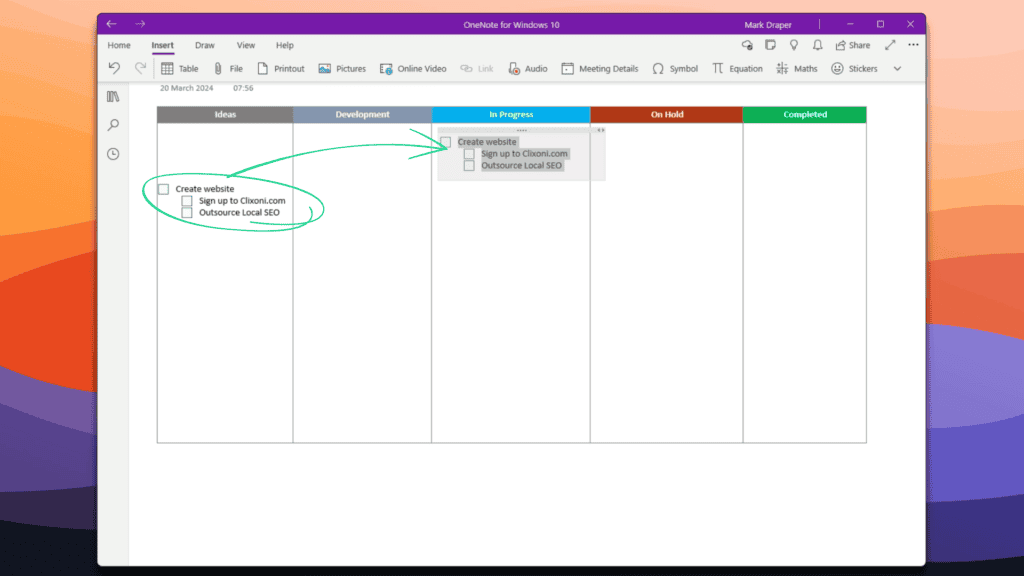
Create the task Outside the Table: We want the tasks to be easy to move around, click anywhere outside the Kanban table and create your task and sub-tasks.
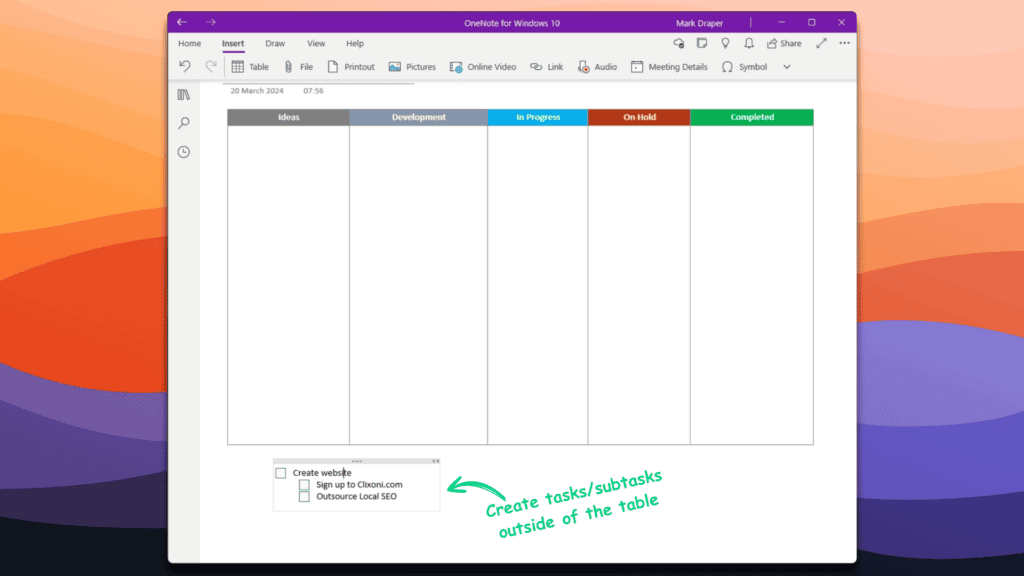
Enter Tasks into Relevant Columns: Input each task into the column that best represents its current stage of completion.
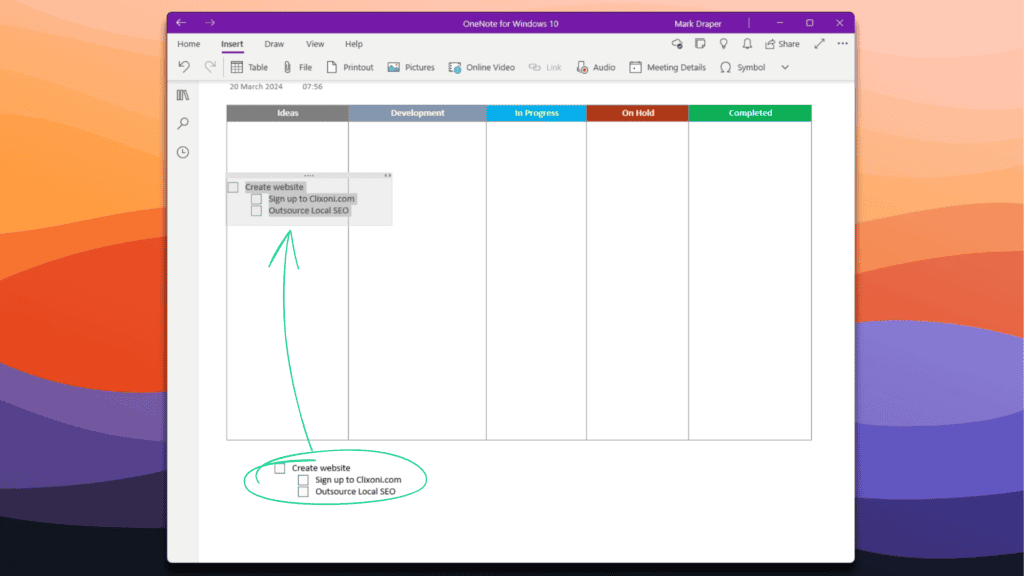
At this point you may need to adjust the size of your table or task box so everything fits.
Track Progress by Column Movement: Move tasks between columns as they advance through your workflow, providing a visual representation of their progress.
Visualize Workload and Progress: By adding tasks to your Kanban Board in OneNote, you create a clear visual of your workload and can easily track the progress of each task.
Assign Task Priorities
Prioritizing tasks effectively is essential for optimizing productivity and achieving goals in your Kanban Board setup within OneNote.
When assigning task priorities, consider using color-coded flags or tags to create a visual representation of urgency and importance.
For instance, you can use red for high-priority tasks that require immediate attention and green for lower-priority tasks.
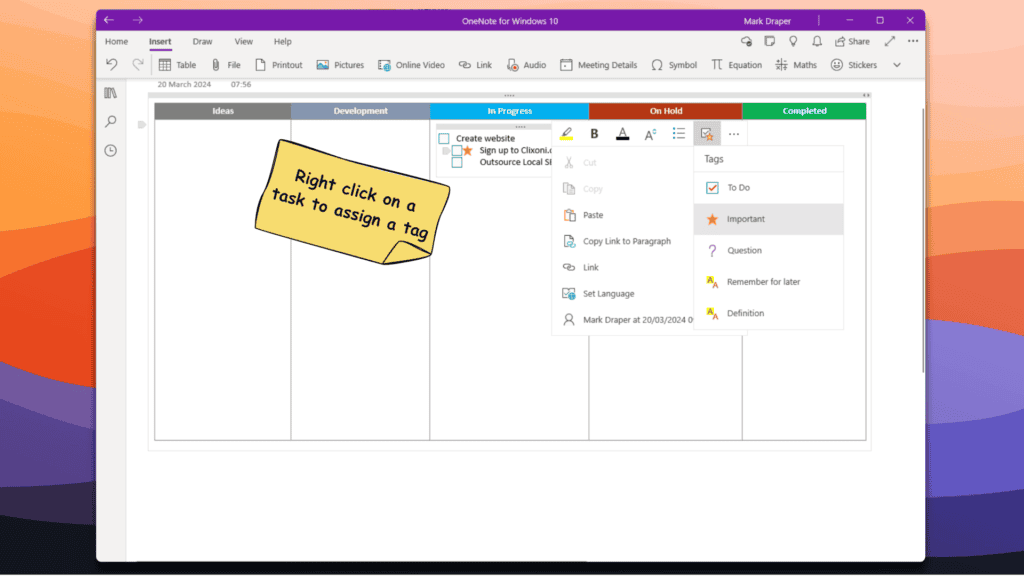
This visual cue allows you to quickly identify the urgency level of each task at a glance.
Additionally, you can utilize symbols or emojis to indicate priority levels, such as exclamation marks for critical tasks and checkmarks for completed ones.
To streamline your workflow, ensure that high-priority tasks are prominently displayed and easily distinguishable from lower-priority ones.
Regularly review and adjust task priorities as needed to align with your goals and deadlines. By consistently updating your task priorities, you can stay organized and focused on what matters most, leading to increased efficiency and goal achievement.
Track Task Progress
To effectively monitor the progress of tasks within your Kanban Board in OneNote, visually track their movement across designated columns and tables. By employing visual tracking methods, you can easily oversee the status of each task and ensure a smooth workflow.
Here are some strategies to help you effectively track task progress:
- Utilize Column Movement: Move tasks between different stages such as Backlog, In Progress, and Completed to indicate where they stand in terms of progress.
- Customize Task Status: Tailor columns to represent various task statuses and priorities, reflecting the specific needs of your project.
- Color-Coding and Tags: Employ color codes or tags to signify task urgency or importance, providing quick visual cues for prioritization.
Customize Board Layout
When customizing your Kanban board layout, consider utilizing different board design options like color-coding, fonts, and styling to visually organize tasks effectively.
Personalize column labels to represent specific stages of your workflow, making it easier to track progress at a glance.
Board Design Options
Now you know how to create a simple board, you can quickly create different columns to reflect different departments or projects.
- Software Development Team: Manage the progress of tasks in different stages of development such as backlog, in progress, testing, and completed.
- Marketing Team: Track marketing campaigns, from ideation and planning to execution and analysis, with columns for each stage like planning, designing, scheduling, and monitoring.
- HR Department: Organize recruitment processes, with stages like candidate sourcing, interviewing, reference checks, and onboarding.
- Operations Department: Monitor inventory levels and order processing, with columns for stock availability, pending orders, in transit, and received.
- Customer Support Team: Manage customer inquiries and issue resolutions, with columns representing new tickets, in progress, awaiting response, and resolved.
- Product Management: Track the lifecycle of a product from concept to delivery, including stages like ideation, requirements gathering, development, testing, and release.
- Finance Department: Monitor expense approvals and reimbursements, with columns for pending approvals, processing, approved, and reimbursed.
- Quality Assurance Team: Manage testing processes, including stages such as test planning, test execution, bug identification, and resolution.
- Research and Development: Organize research projects, with columns representing stages like literature review, experimentation, data analysis, and publication.
Personalize Column Labels
Enhance your Kanban board’s effectiveness by personalizing column labels to align with your unique workflow stages and project requirements. Customizing column labels allows you to represent distinct phases like Backlog, In Progress, and Completed, tailoring the board layout to suit your specific task needs.
By adjusting column names, you can match them with your preferred workflow structure and terminology, enhancing organization. Aligning the column names with the stages of work progression creates a clear and intuitive visual representation, aiding in better task management.
Additionally, the flexibility to modify column labels as necessary enables you to adapt to changes in workflow or project priorities seamlessly. Personalizing your Kanban board’s column labels ensures a customized and efficient workflow management system that resonates with your project demands.
Frequently Asked Questions
Can You Create a Kanban Board in Onenote?
Yes, you can create a Kanban board in OneNote. Utilize tables and sections to customize your layout. Benefit from easy task management and visualization. Tag items for Outlook Tasks integration. Enhance functionality effortlessly.
What Is the Kanban Method of Onenote?
Want to ace task management? Dive into OneNote’s Kanban method. Benefit from visual workflow, task prioritization, and tracking. Flex your work style with adaptable boards. Move tasks smoothly through stages for ultimate productivity.
How Do I Make My Own Kanban Board?
To make your own Kanban board, focus on board organization, task tracking, workflow visualization, and team collaboration. Create sections for different stages, use tables for task details, customize layout, and drag-and-drop tasks for seamless workflow management.
Does Microsoft Have a Kanban App?
Microsoft does not offer a standalone Kanban app, but you can integrate Trello with Microsoft Teams for Kanban functionality. Asana is another popular choice for Kanban, providing various templates for task management.
Final Thoughts
Creating a Kanban board in OneNote is a simple yet powerful way to enhance task organization and productivity.
Once you’ve got the basics set up you can quickly copy the page, so it’s a good idea to create empty templates first and then copy those for your live board.
While this does the job, it’s not as complete solution as platform such as Clixoni which have a full project management system built in.
By following the easy steps outlined in this article, you can effectively manage your tasks and streamline your workflow.
Start creating your own Kanban board today and experience the benefits firsthand!